
Hello Readers..
Today i'm here with a simple tutorial which help you to share Animated GIF Images on Facebook..
By Default Facebook doesn't allow users to upload GIF or Animated Images on Facebook..
Evev If we try to upload a .gif image then it is converted into a .jpg by their servers but beyond this there is a possible way by which we can able to post .gif images on facebook.
Although Facebook do not allow users to upload GIF images on Facebook, users can upload GIF images with the help of some facebook applications. Animated-Pictures is also the same kind of Facebook application which allow users to post animated images on their friend's wall.
Animated-Facebook is also such kind of service which enables us to post animated gif images on facebook wall.either using the default images on their database or using our own images which are hosted anywhere else by just entering the url of the image.
so to create animated gif images..just follow the below Steps !!
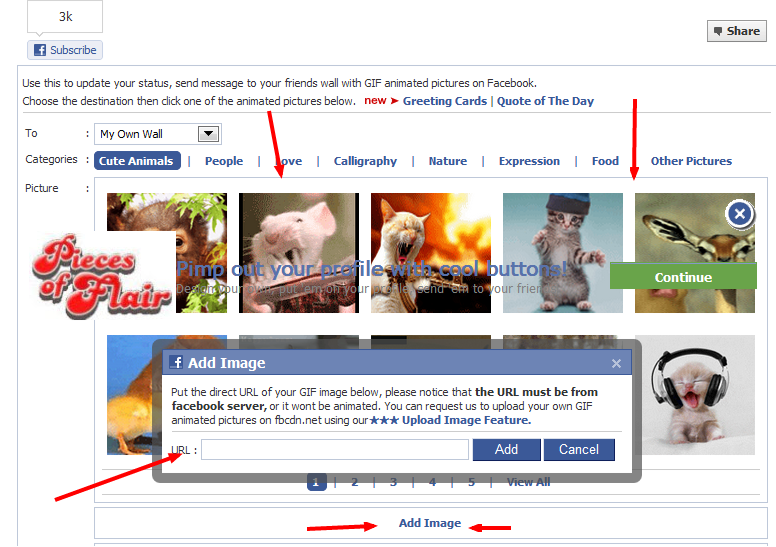
4. If you need to publish your animated image, just click on Upload Image then go into the URL of the image. Right after choosing the image, a whole new pop up will open up that enable you to compose some text before posting this picture.
5. So now you've completed Choosing your image which you want to share. then Click on the Image And you will see a box like below.
6. At this point simply click on share and that’s it your entire animated picture will now be live directly on your wall.

This is How you will able to Post Animated GIF images on Facebook..
Even More to Share Animated GIF Images on Facebook..you can also Share MP3 or SWF files on Facebook with this Application..
Just see the Image Below:
Today i'm here with a simple tutorial which help you to share Animated GIF Images on Facebook..
By Default Facebook doesn't allow users to upload GIF or Animated Images on Facebook..
Evev If we try to upload a .gif image then it is converted into a .jpg by their servers but beyond this there is a possible way by which we can able to post .gif images on facebook.
Although Facebook do not allow users to upload GIF images on Facebook, users can upload GIF images with the help of some facebook applications. Animated-Pictures is also the same kind of Facebook application which allow users to post animated images on their friend's wall.
Animated-Facebook is also such kind of service which enables us to post animated gif images on facebook wall.either using the default images on their database or using our own images which are hosted anywhere else by just entering the url of the image.
so to create animated gif images..just follow the below Steps !!
2. visit the Animated Picture application on Facebook.
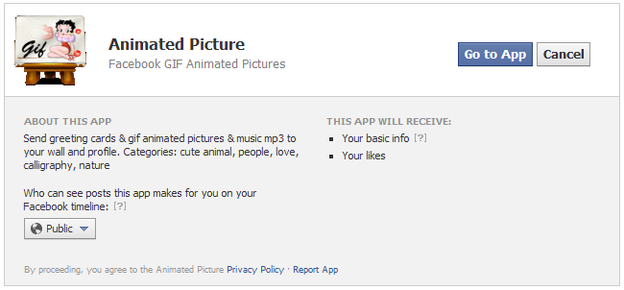
3. Now as you seen above Screenshot just click on the Go to App button so now you will be redirected to their interface.now either select the default images or you may select any other images hosted anywhere by using the image URL.
3. Now as you seen above Screenshot just click on the Go to App button so now you will be redirected to their interface.now either select the default images or you may select any other images hosted anywhere by using the image URL.
4. If you need to publish your animated image, just click on Upload Image then go into the URL of the image. Right after choosing the image, a whole new pop up will open up that enable you to compose some text before posting this picture.
5. So now you've completed Choosing your image which you want to share. then Click on the Image And you will see a box like below.
6. At this point simply click on share and that’s it your entire animated picture will now be live directly on your wall.

This is How you will able to Post Animated GIF images on Facebook..
Even More to Share Animated GIF Images on Facebook..you can also Share MP3 or SWF files on Facebook with this Application..
Just see the Image Below:
 |
| click image to enlarge |
There is one more section that ask you to Put MP3 or SWF..
just choose what you want to share and Put the url in box as the extension with .mp3 or .swf..
just choose what you want to share and Put the url in box as the extension with .mp3 or .swf..
Example :
http://wfs-02.wapka.mobi/download/b/8/b/159244_b8b0dc54e3fcde99fb77db198dc6.swf/845fc33d64f337a2ce24/Animated_clock.swf
After putting url in box..just click on image want to share..and again click on Share as above in step 6..
This is How you can Share Animated GIF images with MP3 or SWF Files..
http://wfs-02.wapka.mobi/download/b/8/b/159244_b8b0dc54e3fcde99fb77db198dc6.swf/845fc33d64f337a2ce24/Animated_clock.swf
After putting url in box..just click on image want to share..and again click on Share as above in step 6..
This is How you can Share Animated GIF images with MP3 or SWF Files..
That's All !!
Enjoy :)
Enjoy :)


