Sign up for FREE daily Updates.

How To Get Someone’s IP Address Through Facebook

1 comment Follow me on twitter

Hello Friends ! Today i am going to post the trick for getting someone’s IP through Facebook.

Step 1 – First invite or ping that person for a chat on facebook .

Step 2 – Make sure your all other tabs in browser and other services in computer are closed. If Possible for you then delete all the cookies-cache and browsing history from your browser.

Step 3 – While chatting on Facebook go to Start >- Run >- cmd .

Step 4 – After Opening command Prompt Type netstat -an command and hit Enter.

Step 5 – Now you will get IP Address of all the established connections there .


Step 6 – Note all the suspicious IP’s and trace user using IP address tracer sites like whatismyip or ipmango.com .

You can use same trick for tracing IP of someone’s on Skype, gtalk and Yahoo Messenger..


That's All.!!
Enjoy
◄◄READ MORE►►

Face Software- All in One Software for Facebook

Leave a Comment Follow me on twitter

Face Software:

This software allows you to do a lot more stuff on facebook that is not readily available for you on the website. 

Facebook software is very safe and secure to use and most importantly It WILL NEVER make a post on your facebook account about our software or phish / store your login information in any shape or form.
 

SOME FEATURES:

Example : 
Deleting facebook wall posts from your timeline within a time period, Spying on your love ones, monitoring your friends, find who deleted you, and over 30 more features with more being added per your request..


Key Features Of Face Software:


Status Deleter

Self Scanner

Vip Spy

Who Deleted Me

Comment/Likes Spy

Breakup Notifier

Pics Downloader

Photo Deleter

Friends Post Deleter

Birthday wishers

Singles Finder

Social Account Finder

Mutual Crush

Comment Deleter

Get Fans

Friends Post Deleter

Tag Remover

Friends Birthday Wisher

Save Friends

Friend Adder

Contact Infos


Official Website:

http://www.facesoftware.com/  

Download Face Software:

http://www.mediafire.com/?5xsd9477guf43hj


That's All.!!
Enjoy
◄◄READ MORE►►

How to Download Torrent Files Using IDM n ZbigZ easily [Tutorial]

Leave a Comment Follow me on twitter

I am going to tell you a method using which you can download Torrent files easily..  

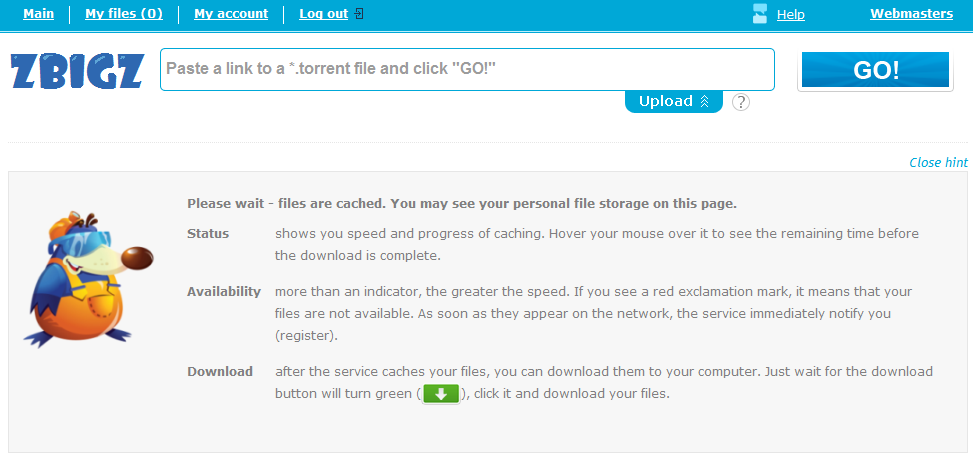
We will be using a Site named as  ZbigZ

Visit ZbigZ and Signup in order to start.

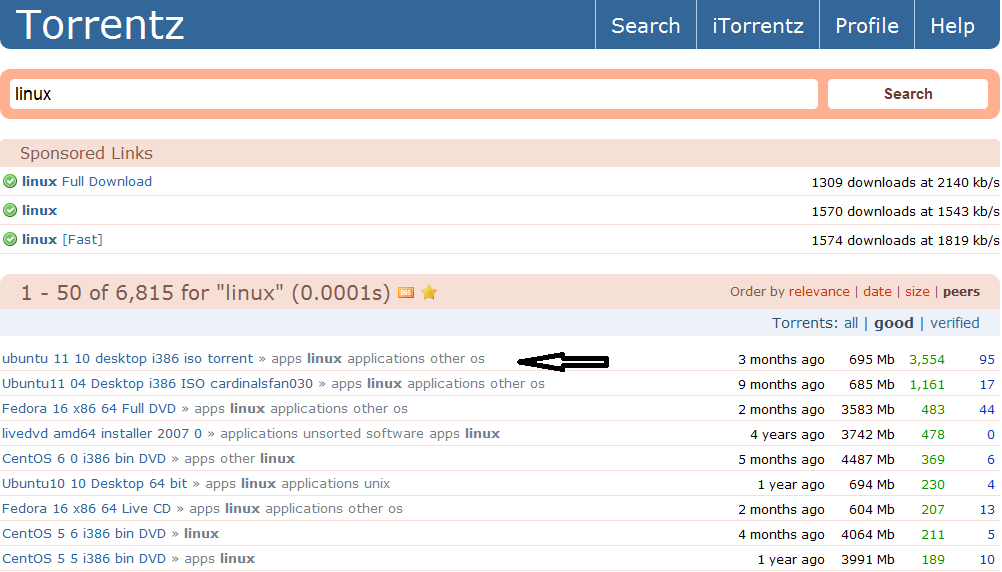
After that Visit torrentz.com and search for your file.


Then Download the torrent file from any server.


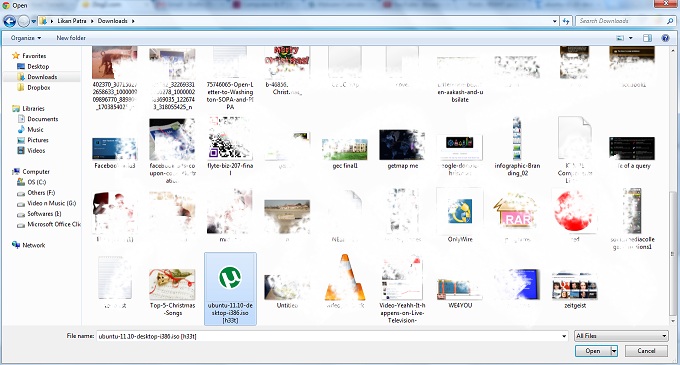
Now Open your ZbigZ page and Click on upload button and load your torrent file.


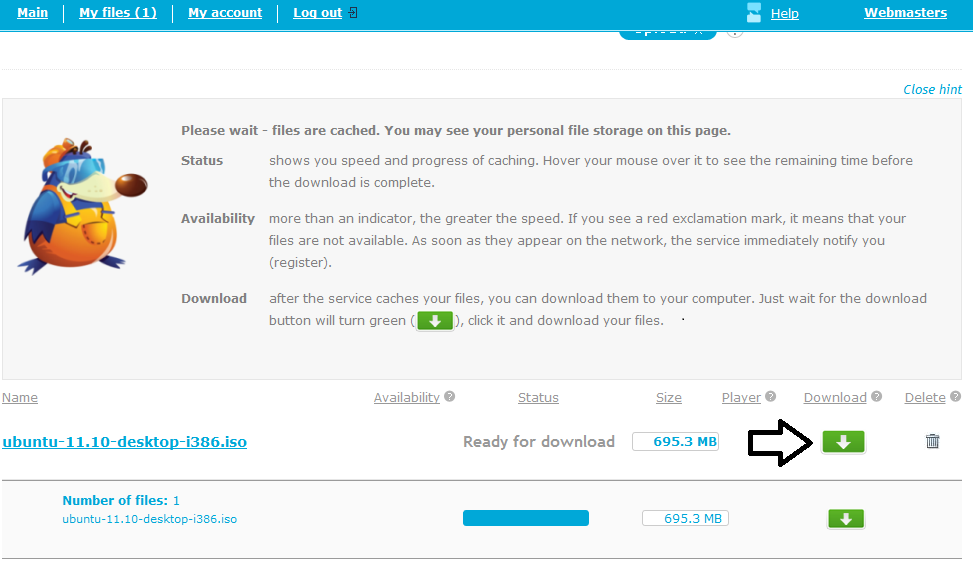
After uploading the torrent file the server twill take a while to make your File ready for downloading.
After a while there will a Green Color download button in the right hand side of the page.


Then Click on the Button to start your Download before that it will ask another question and click on “Free” so that you can download it for free. 


Now Download Highspeed Torrent files easily With Internet Download Manager..


Enjoy!:) 
◄◄READ MORE►►

How To Update Facebook Status in Blue Text

Leave a Comment Follow me on twitter

Facebook magic trick was widely acknowledged by users and it went viral within few days..
Facebook Blue text status update is an extension of magic trick..

It uses the same concept of Profile ID’s.
However the only limitation of Blue colored status trick is that you status will be in the form of link and it will point to the the profile ID used in the status.
If you have changed your profile id into username then you can find it by clicking here.

Trick to Update Facebook Status in Blue Text:

►Login to your Facebook Account
►In the Status Update field copy/paste the following code
@@[0:[136269139737588:1: Your Text Here]]@[136269139737588:]

Replace Your Text Here with your status update text.


You Can Also Update Status in Blue Text Like Below:


@[1: ]@@[1:[0:1: Type Here]]

Now just click on Post button your status will be updated as clickable blue text..

That's All.!!
Enjoy!:)
◄◄READ MORE►►

How To Find the Profile ID In Facebook

Leave a Comment Follow me on twitter

Facebook Usernames have replaced the good old user ID’s as they were long and hard to remember..

But there are lot of applications and tricks like Magic Number and Blue coloured Facebook status trick which requires your Facebook ID.You can find the User ID of any page,Group or profile by using Facebook graphs..

How To Find the Profile ID In Facebook:


Finding the Profile ID of those users who haven’t changed their User ID number with the username.

Now just look at the URL in the address bar it will be something like this..
http://www.facebook.com/profile.php?id=123456789

Here 123456789 is profile ID.


For those who have Changed their User ID numbers with username, finding the Profile ID can be little bit tricky .
Now after the slash (/) add your username and hit Enter.
Now in the screen look for the “id” this will be your Facebook Profile ID.

That’s it! By this trick you can find Profile ID for your profile as well as for Pages.

Note: Remember the User ID number of pages is of 12 digits not of 15.


That's All.!!
Enjoy! :)

◄◄READ MORE►►

Magic Number Trick in Facebook

Leave a Comment Follow me on twitter

These days magic number trick is becoming a rage on facebook..

Anything related to facebook (however small it may be) is sure to create a buzz among people..

These magic numbers are nothing but the unique ID numbers of the Users, Pages or Groups..

When you will paste these numbers in your satus they automatically will get converted into your profile,group or page link.
You can also send these to your friends and ask them to paste in your status.They will certainly get amazed.

How it Works:

                                         
►Login to your Facebook account..

►Go to your profile link or to your friends profile link and there look for the ID number in the facebook URL.


Copy the ID number and replace it in the following number

@+[ID:0:]

Suppose 199500840125082 is the ID with which you want to replace the code. So your code will be
@+[199500840125082:0:]

Now ask your friends to copy/paste this code in the status or in comment section and remove + sign from it, make it as @[199500840125082:0:]

Then hit Enter and see the Magic.


That's All.!!
Enjoy!:)

◄◄READ MORE►►

How to Send Colorful Text in Facebook Chat

Leave a Comment Follow me on twitter

Facebook has restricted its user to chat in black text due concerns of server overloading and speed..
But now you are no longer bound to chat in black text..
There are some special codes for you that empower you to send colourful text in chat..

This trick is solely based on the fact that when profile ID’s are inserted in between square brackets, it automatically transforms into the profile picture. These ID’s are specially created for this purpose.

You can also send messages in colourful text but these codes will not work in Status update..

This will also not work if the other person is using chat from his mobile..


How to Send Colourful Text in Facebook Chat:

Here is the list of codes with their alphabets.


[[107015582669715]] = A

[[116067591741123]] = B

[[115602405121532]] = C

[[112542438763744]] = D

[[115430438474268]] = E

[[109225112442557]] = F

[[111532845537326]] = G

[[111356865552629]] = H

[[109294689102123]] = I

[[126362660720793]] = J

[[116651741681944]] = K

[[115807951764667]] = L

[[106596672714242]] = M

[[108634132504932]] = N

[[116564658357124]] = O

[[111669128857397]] = P

[[107061805996548]] = Q

[[106699962703083]] = R

[[115927268419031]] = S

[[112669162092780]] = T

[[108983579135532]] = U

[[107023745999320]] = V

[[106678406038354]] = W

[[116740548336581]] = X

[[112416755444217]] = Y

[[165724910215]] = Z


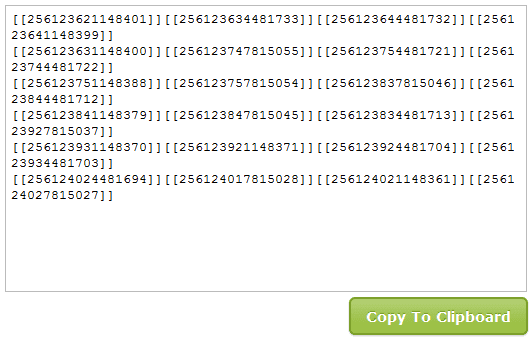
To create a word of colourful text copy the codes of alphabets and make sure to insert single space between the each alphabetic code. Here is the code for SOFTRICKZS.


SOFTRICKZS: [[115927268419031]] [[116564658357124]] [[109225112442557]] [[112669162092780]] [[106699962703083]] [[109294689102123]] [[115602405121532]] [[116651741681944]] [[165724910215]] [[115927268419031]]

That's All.!!
Enjoy..:)
◄◄READ MORE►►

How to install turbo C Compiler

Leave a Comment Follow me on twitter


Turbo C was an Integrated Development Environment and compiler for the C programming language from Borland. It was first introduced in 1987 and was noted for its integrated development environment, small size, extremely fast compile speed and comprehensive manuals.

In May 1990, Borland replaced Turbo C with Turbo C++.

Here we going to talk about Turbo C++ 3.0 version. it is best of all version and widely used by students.
Turbo C++ 3.0 was released in 1991. Initially released as an MS-DOS compiler, 3.0 supported C++ templates, Borland’s inline assembler, and generation of MS-DOS mode.

If you know How to Install Turbo C Compiler..It will Help you to Install Turbo C/C++..
So Lets See How to Install Turbo C Compiler..!!


To install Turbo C compiler :

1. First you need to download the compiler.

2. After finished download unzip the turbo c to folder & open the folder.
Note: For the time of installation the folder should be present anywhere in Drive C.. like desktop, documents, downloads..

3. Run install.exe and press ENTER to continue.


4.Enter the SOURCE drive to use: C


5. Enter the SOURCE Path: source path is where you extracted the turbo c.zip file we don’t need to give the source it will find and take automatically. you just press ENTER at this step.


6. Then scroll down by arrow key and Start Installation.


Now you have successfully installed turbo c compiler.

Now to open the turbo c compiler 
Go to Drive C > TC > Bin > TC .exe


You can have shortcut on desktop so that no need to follow long path to open TC.

Just open TC folder in drive C select TC.exe and right click on it, Click on send to> Desktop (create shortcut).

That's All..!!
Enjoy.. :)

◄◄READ MORE►►

How to Create your own Images as Emoticons for Facebook Chat

Leave a Comment Follow me on twitter
Today I'm going to teach you How images can be send in Facebook Chat created using a simple online website called “Smileyti.me”. 
It’s a simple image uploading and emoticon conversion website which will simply create some different codes for your images when they are complied together you get your image drawn right in front of your eyes.

So now we have a created a Gif image for helping you out in uploading your image and using that website below so now just follow below steps and have fun creating your own funny images.


Create your own Image Emoticons using Smileyti.me :


  • Now After you Upload your Image you will get your code like below.

         
  • Now that’s your final code, just copy this code and paste it in your Facebook chat and you will see your image rendering simply perfect.

Have fun and I hope you enjoyed this amazing article by us..:)
Enjoy..:)

◄◄READ MORE►►

How To Chat With Command Prompt

Leave a Comment Follow me on twitter

If you are a pc user on a network you can set up a private chat directly through your Command Prompt. All that’s needed is the IP address for the users system in which you wish to communicate. This IP address can also be found in the Command Prompt. To find a computers IP address go to your Command Prompt and type ipconfig. This will reveal your IP address, Subnet Mask & Default Gateway. Copy the IP address of the computer in which you are sending a message to.  

That means If you want personal chat with a friend
you don't need to download any yahoo messenger
All you need is your friends IP address and Command Prompt.

1. Firstly, open Notepad and enter:

@echo off
:A
Cls
echo MESSENGER
set /p n=User:
set /p m=Message:
net send %n% %m%
Pause
Go to A


2. Now save this as "Messenger.bat". Open that .bat file and in Command Prompt you should see:

MESSENGER
User:


3. After "User" type the IP address of the computer you want to contact.


4. After this, you should see this:

Message:

Now type in the message you wish to send.Before you press "Enter" it should look like this:

MESSENGER
User:27.196.391.193
 Message: Hi

Now all you need to do is press "Enter", and start chatting!


That's All.!!
Enjoy It! :)
◄◄READ MORE►►

How to Change Windows XP Logon Screen background

Leave a Comment Follow me on twitter


You can put your favorite image or picture in the background of the logon screen by doing the following methods:


  • Click the Start button and select “Run”
  • In the “open” field, type "Regedit"(withou Quotes) and click OK
  • In the registry editor, navigate to HKEY_USERS\.DEFAULT\CONTROL PANEL\DESKTOP and double-click the string “wallpaper”
  • Enter the full path and filename of the .bmp image that you want to use as background (the image must be in .bmp format)
Click “OK” and close the registry editor ..

Note: Should Restart the computer for changes.


If you want to see the background set in tiled effect with the bitmap then follow the below steps:


  • Click the Start button and select “Run”
  • In the “open” field, type regedit and click ok
  • change the string HKEY_USERS\.DEFAULT\CONTROL PANEL\DESKTOP\TILEWALLPAPER to “1″ instead of “0″
Click “OK” and close the registry editor..

That's All..!!
Enjoy..:)
◄◄READ MORE►►

How to Speed Up Idea Netsetter USB Internet

1 comment Follow me on twitter
Idea net setter is termed as the prepaid data card usb wireless internet service from idea cellular ltd.it is usable with laptops as well as pc with sms facility which enables you to surf internet on the move.They started the service with a good speed rate but nowadays many users complain about its speed as it is very slow. Everyone searches on the internet for idea net setter speed booster and they get some useless links at all.

There is good methods for speedup net setter as well as any internet connection .. but remember one thing the surfing and downloading speed is truly 80% depends upon the isp speed. But we can play with the internet settings to do a boost.


To speed up Internet Connection on idea:

1.Download Cablenut application from
http://www.brothersoft.com/cablenut-62174.html

2.In Cablenut apply the following settings


Default Receive Window = 17520
Default SendWindow = 8096
Disable Address Sharing = 1
Initial Large Buffer Count = 10
Initial Medium Buffer Count = 24
Initial Small Buffer Count = 32
Large Buffer Size = 4096
Max Fast Transmit = 6400
Medium Buffer Size = 1504
Priority Boost = 0
Small Buffer Size = 128
Transmit Worker = 32
Fast Send Data gram Threshold = 1024
Enable Fast Route Lookup = 1
Enable PMTU Discovery = 1
Ignore Push Bit On Receives = 0
Global Max Tcp Window Size = 8760
Max Free Tcbs = 2000
Max HashTableSize = 4096
Max Norm Look up Memory = 5000000
Sack Opts = 1
Syn Attack Protect = 1
Tcp1323Opts = 0
Tcp LogLevel = 1
Max Dup Acks = 2
Tcp Max Half Open = 100
Tcp MaxHalfOpenRetried = 80
Tcp Recv Segment Size = 1460
Tcp Send Segment Size = 1460
Tcp Timed Wait _Delay = 32
Tcp Useb RFC1122 Urgent_Pointer = 0
Tcp Window _Size = 8760
Maximum ConnectionsPer1_0 Server = 8
Maximum Connections Per Server = 4
Default TTL = 128
DisableUser TOS_ Setting = 0
Tcp Max Data _Retransmissions = 6
Default TOSValue = 91

3.Download Tcp Optimizer From
http://www.speedguide.net/files/TCPOptimizer.exe

4.Apply the following settings in Tcp optimizer
Max MTU - 1500
MTU Discovery - Yes
Black Hole Detect - No
Selective ACKs - Yes
Max Dup ACKs - 2
Time to Live (TTL) - 128
TCP 1323 Options - uncheck both


5.Apply all and restart your computer.


Note: speed up idea netsetter settings may change your computer network settings. always perform the operations after creating a restore point.

That's All.!!
Enjoy!:)
◄◄READ MORE►►
Premium WordPress Themes